Problem Statement
When managing massive datasets in a secure, scalable environment, it’s essential to select the right tools and strategies. Recently, we encountered an interesting challenge: a client provided us with a 70 GB database as a tar file backup (Post restore 1TB), which we downloaded via FTP. Due to strict security protocols, we couldn’t establish any direct or VPN connection to their network, so the tar file was our only access to their data.
Our initial step was to restore the database in Azure SQL Database. While it solved immediate access needs, the database was costing around $200 per day to run—a cost that quickly adds up. This prompted us to rethink our approach and find a more cost-effective, long-term solution.
Exploring Parquet for Efficient Data Storage
Given the volume of data, we knew that converting it to a compressed, optimized format would be ideal. Parquet—a columnar storage format—became the clear choice due to its efficient storage and compatibility with popular data analytics tools. Parquet files not only reduce storage costs but also enable fast data access, which is invaluable for analytics workloads.
From Python to Azure Data Factory: Simplifying the Transformation
Our initial approach involved Python scripts to parse the database tables and convert them into Parquet files. However, this manual approach brought additional challenges, especially around testing and validating the conversion process across such a large dataset.
At this point, our Data Science team suggested exploring Azure Data Factory (ADF). ADF turned out to be a game-changer, offering in-built features to streamline the entire process:
- Schema Mapping and Transformation: ADF simplifies schema mapping, allowing us to transform tables into Parquet format with minimal configuration.
- Integration with Azure Storage: ADF can store the transformed Parquet files directly in Azure Data Lake Storage or Blob Storage, making it easy to maintain, manage, and access.
- Scalability and Cost Efficiency: ADF’s scalable architecture and pay-as-you-go pricing help us control costs by only using resources as needed.
Implementing the Solution with Azure Data Factory
Here’s a step-by-step explanation of each image to help you understand how to use Azure Data Factory (ADF) for converting PostgreSQL tables into Parquet files and storing them in Azure Storage. Each image corresponds to a component or configuration step in an ADF pipeline.
Step A: Configuring Linked Service for PostgreSQL in Azure Data Factory
Create a New Linked Service for PostgreSQL
- Go to Manage in Azure Data Factory, and select Linked Services from the left sidebar.
- Click on + New to add a new linked service, then search for PostgreSQL and select it.
- Click Continue to configure the PostgreSQL linked service settings.
Configure Connection Details
- Name: Give your linked service a descriptive name, such as
PostgreSqlLinkedService. - Server: Enter the hostname or IP address of your PostgreSQL server.
- Database: Specify the name of the PostgreSQL database you are connecting to.
- Username and Password: Enter the credentials for your PostgreSQL database. Optionally, you can securely store these in Azure Key Vault and reference them here.
- Name: Give your linked service a descriptive name, such as
Test Connection: Click Test Connection to ensure that ADF can successfully connect to your PostgreSQL database. If the connection is successful, save the linked service.
Step B: Adding Parameters for Table Name and Table Schema
After configuring the linked service, we’ll add parameters for table_name and table_schema in the dataset associated with the linked service. These parameters will allow you to dynamically fetch specific tables and schemas during runtime.
Configuring the Dataset with Parameters for table_name and table_schema
Create a New Dataset for PostgreSQL
- Go to the Author tab in ADF, select Datasets, and click + New dataset.
- Search for PostgreSQL and select it as the dataset type.
- Select your PostgreSQL linked service (e.g.,
PostgreSqlLinkedService) as the connection for this dataset.
Add Parameters for
table_nameandtable_schema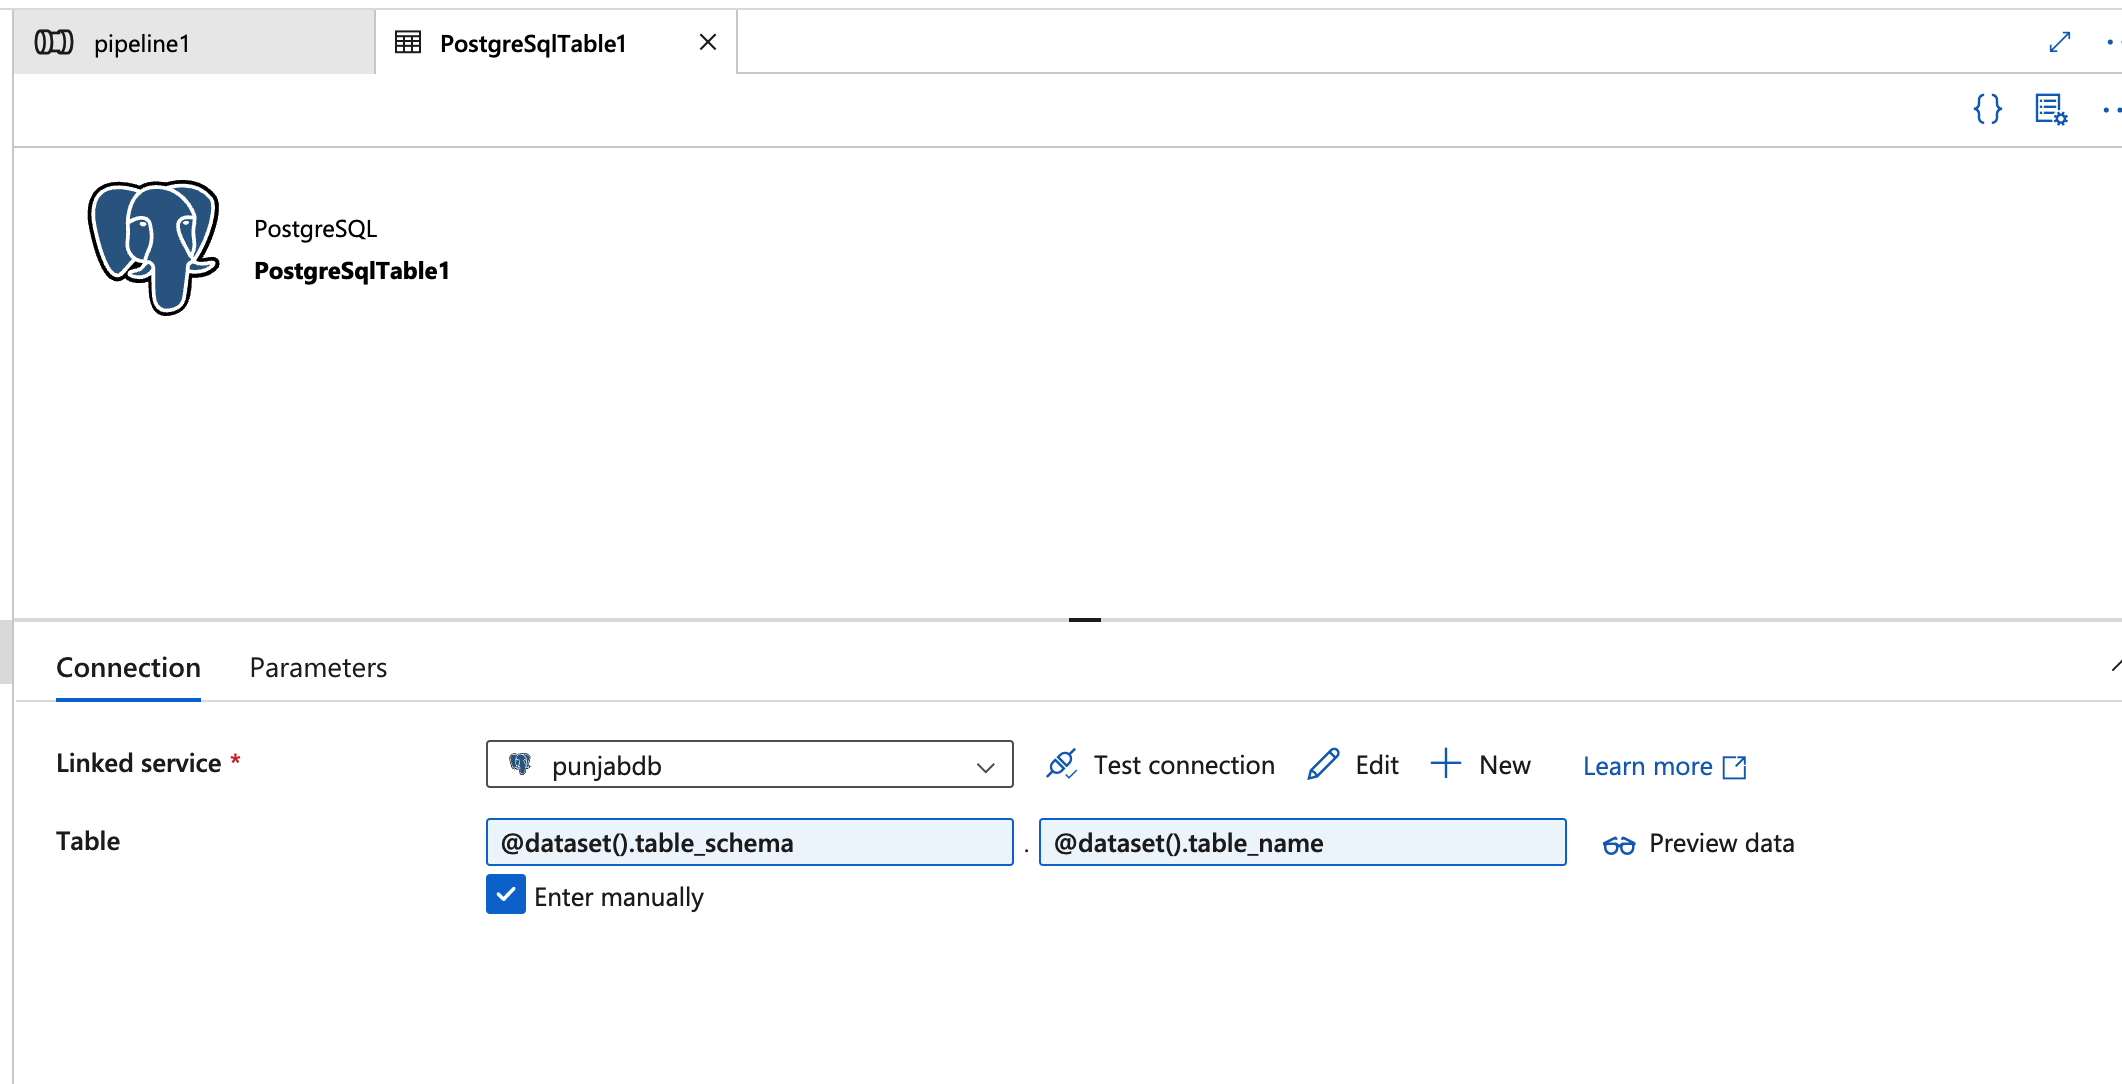
- In the Dataset properties panel, click on the Parameters tab.
- Add two new parameters:
- table_name: Set this to
stringtype. This parameter will dynamically take the name of each table being processed. - table_schema: Set this to
stringtype as well. This parameter will dynamically hold the schema name of each table.
- table_name: Set this to
Configure the Source with Parameterized Values
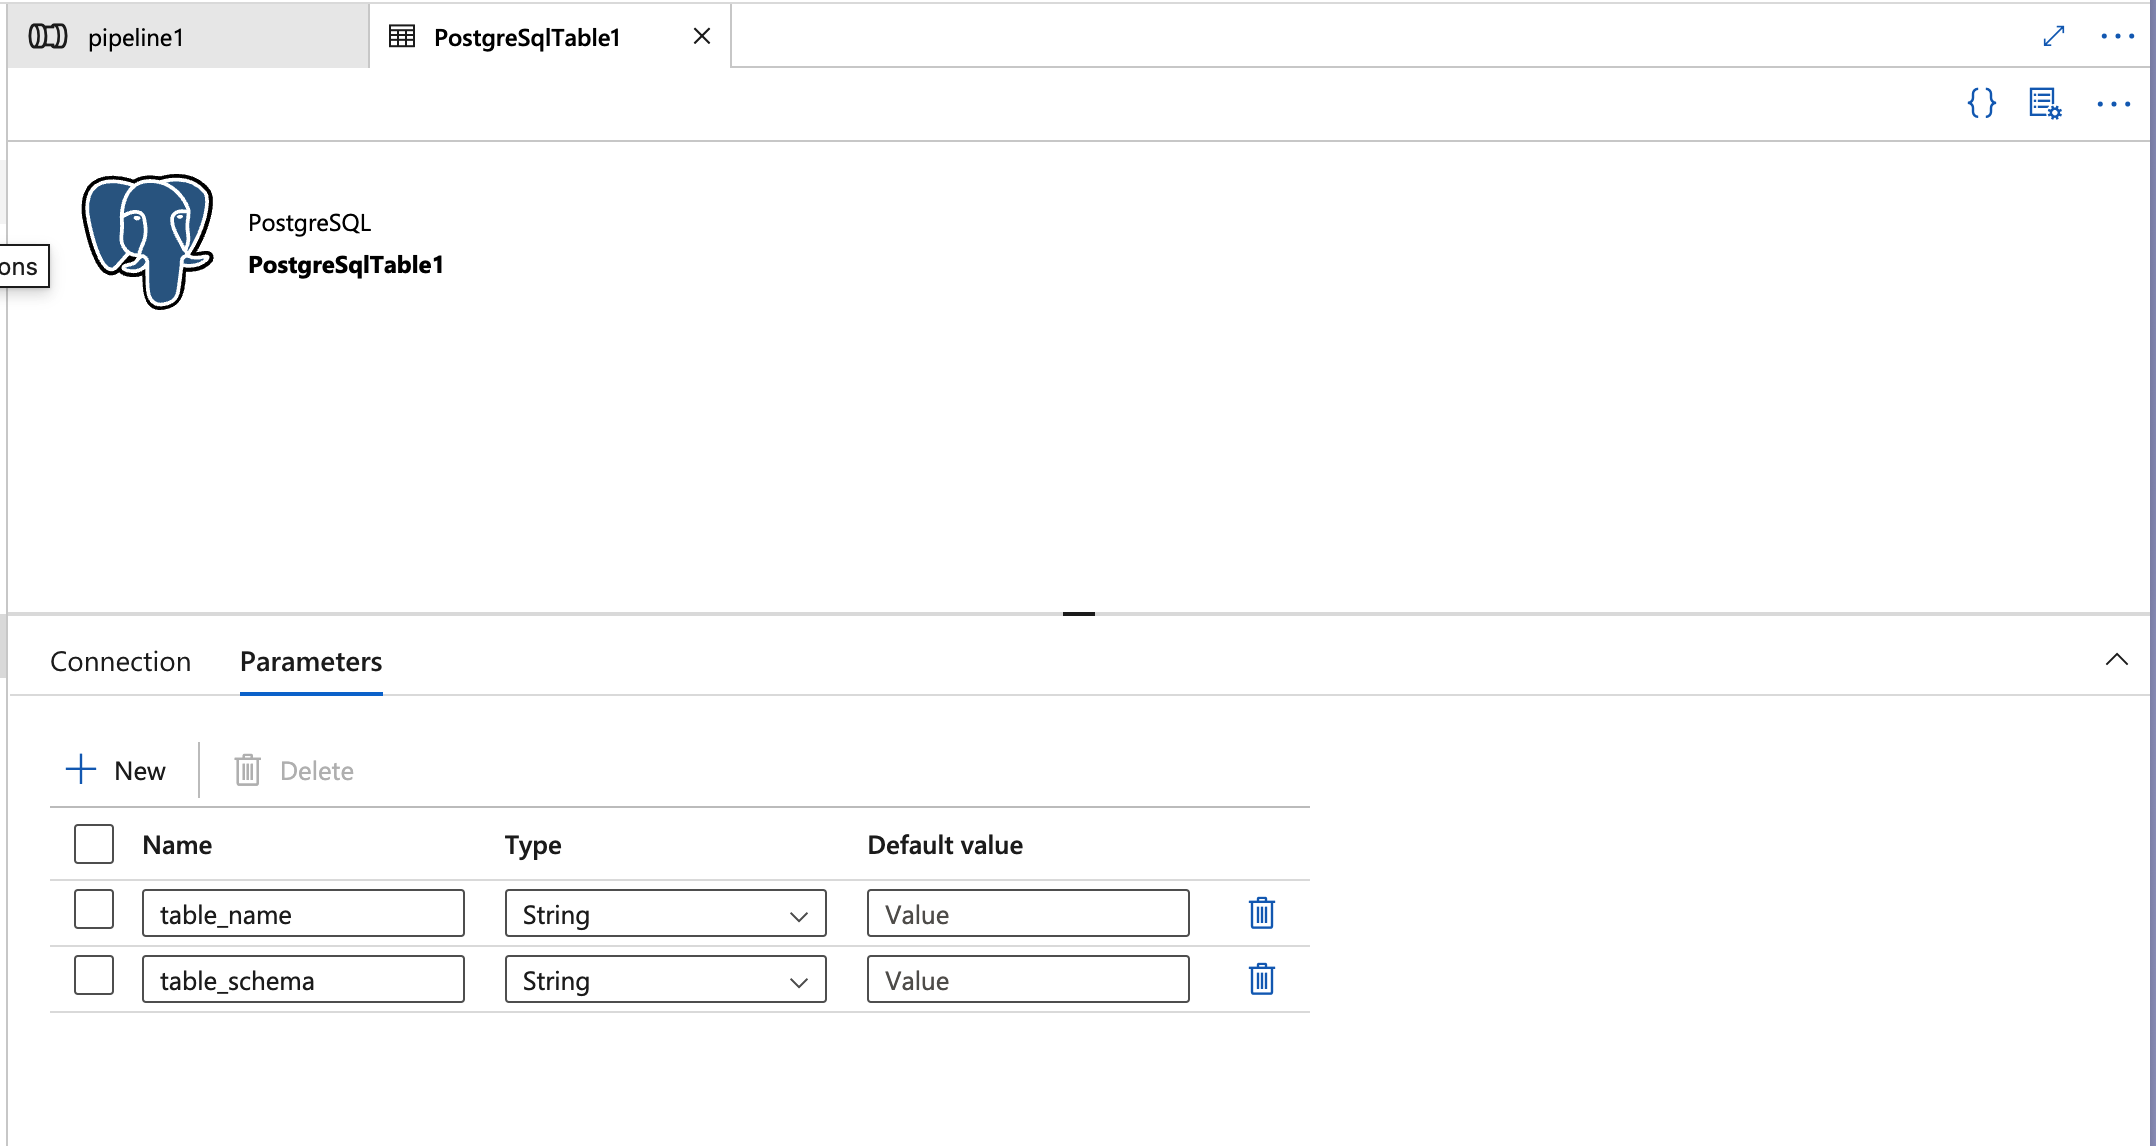
- Go to the Connection tab in the dataset configuration.
- Set the Table name field to accept parameterized values by using expressions:
- Enter
@dataset().table_schemafor the schema. - Enter
@dataset().table_namefor the table name.
- Enter
Using these expressions will allow the dataset to dynamically assign the table name and schema based on the parameters passed at runtime. This setup is essential for enabling the ForEach loop to process multiple tables without manual intervention.
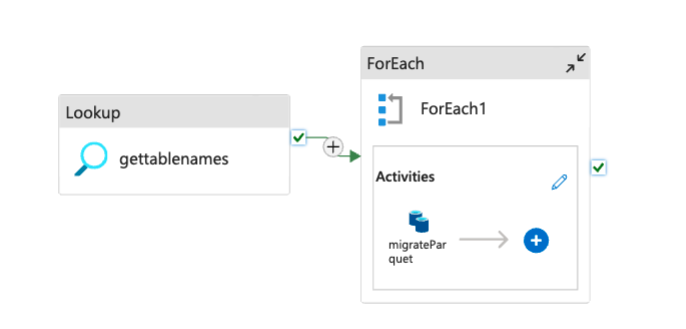
Step C: Pipeline Overview with Lookup and ForEach Activity
Lookup Activity (
gettablenames): This component retrieves the list of tables from the PostgreSQL source. It acts as the first step in the pipeline to fetch metadata about the tables that need to be migrated.ForEach Activity (
ForEach1): The output from theLookupactivity (table names) is passed into aForEachactivity. This loops through each table name in the dataset and applies the specified transformation or migration activities to each table one by one.This setup allows you to dynamically process each table from the PostgreSQL database without hardcoding table names, making the pipeline more flexible and reusable.
You are looking to update a query and parameters in an Azure Data Factory (ADF) configuration based on your specific database usage, table name, and schema. This involves adding parameters for table_name and table_schema in the dataset associated with the linked service, allowing for dynamic fetching of tables and schemas during runtime.
Step D: Configuring the Source Dataset for PostgreSQL
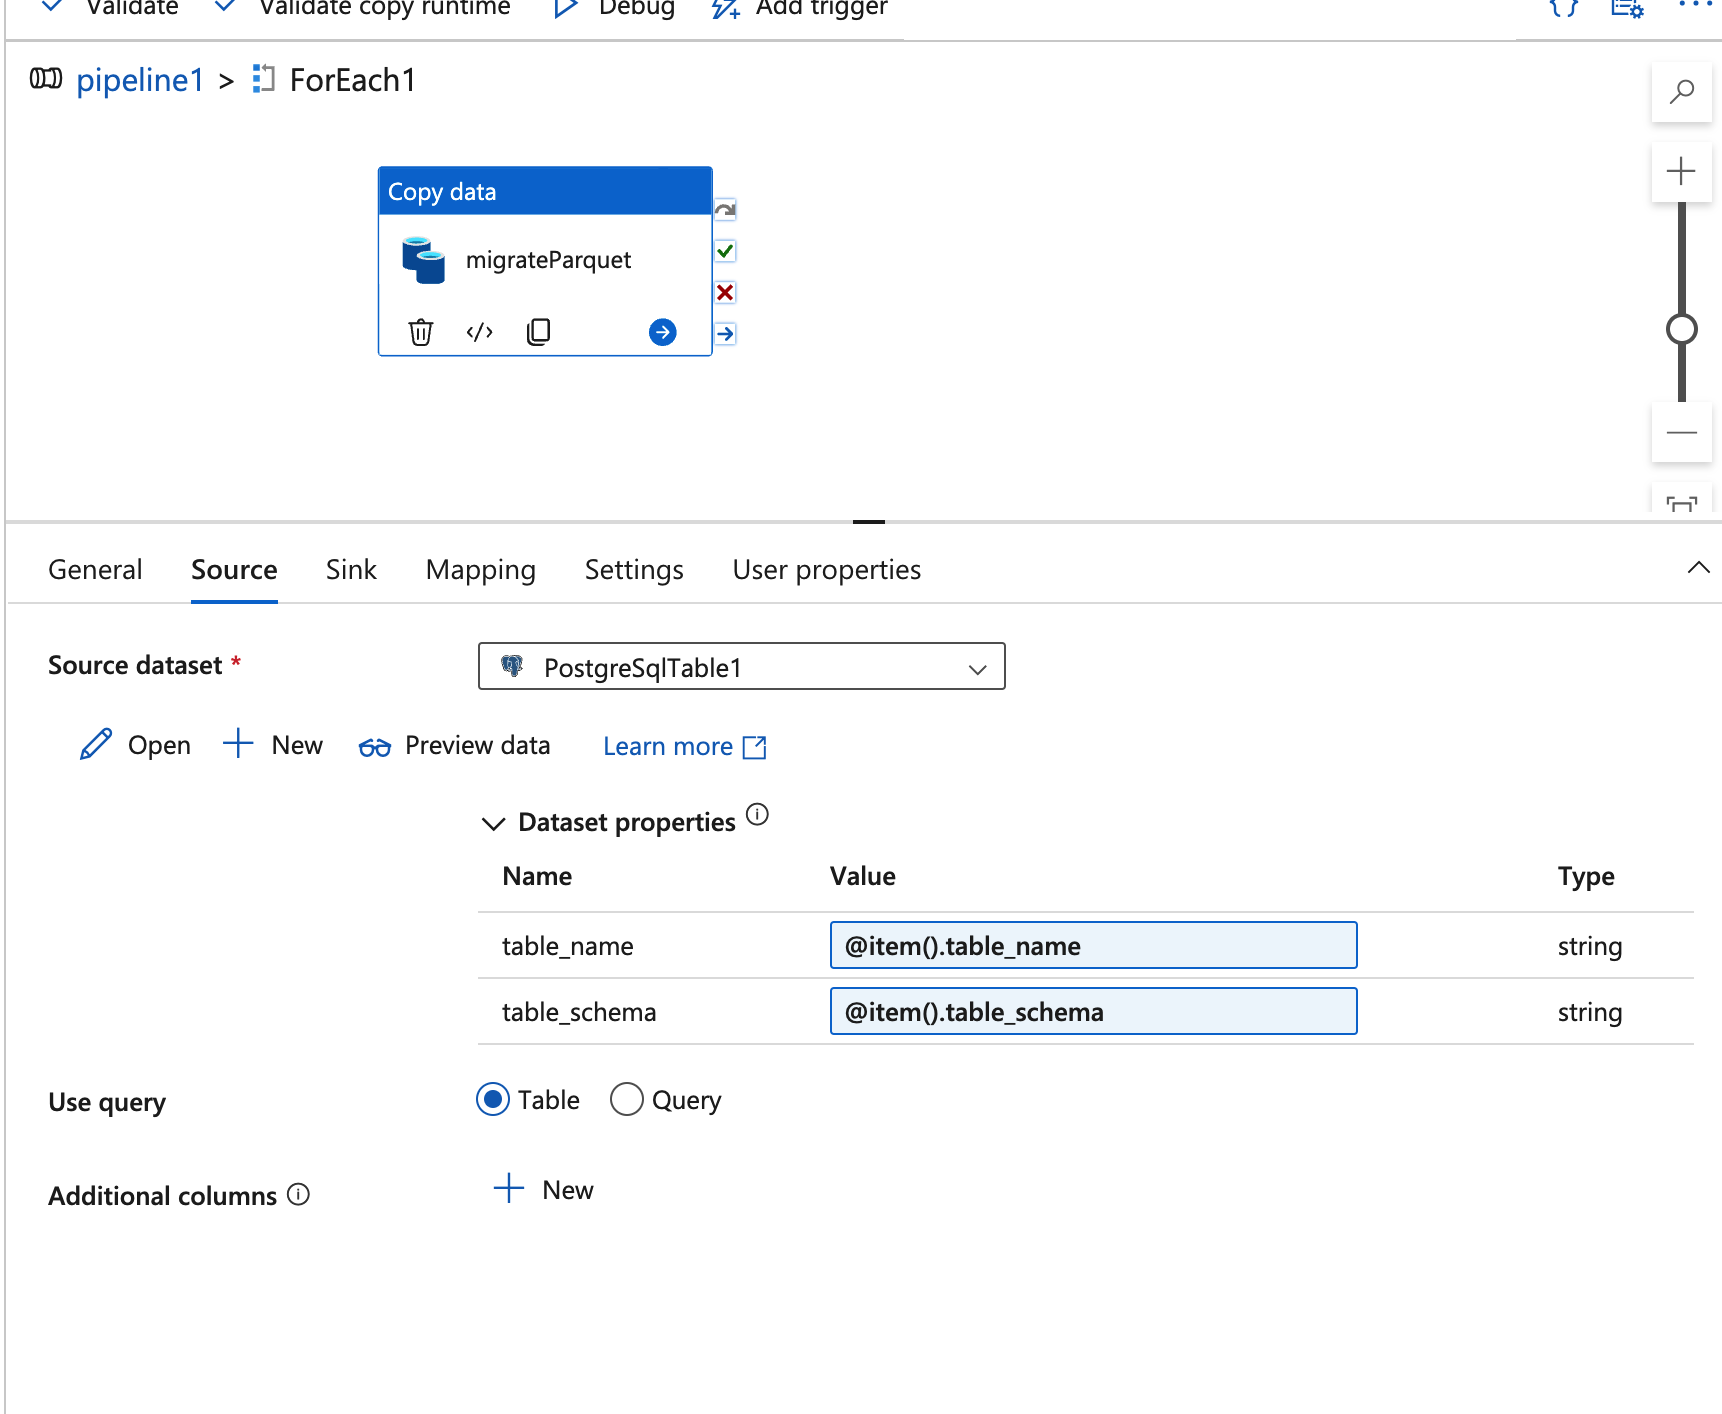
Source Dataset (
PostgreSqlTable1): This tab specifies the source dataset, which is the PostgreSQL table to be migrated.Dataset Properties:
table_nameandtable_schema: Similar to the Sink configuration, these properties use the expressions@item().table_nameand@item().table_schemato dynamically set the name and schema for each table.
The use of dynamic parameters allows ADF to fetch each table individually, aligning it with the table list from the
Lookupactivity.Use Query Option: The
Use querysetting is configured to “Table” instead of “Query,” meaning ADF will pull the entire table instead of running a custom SQL query. This setting is helpful if you want a straightforward transfer without filtering rows or columns.
Step E: Configuring the Sink Dataset for Parquet Conversion
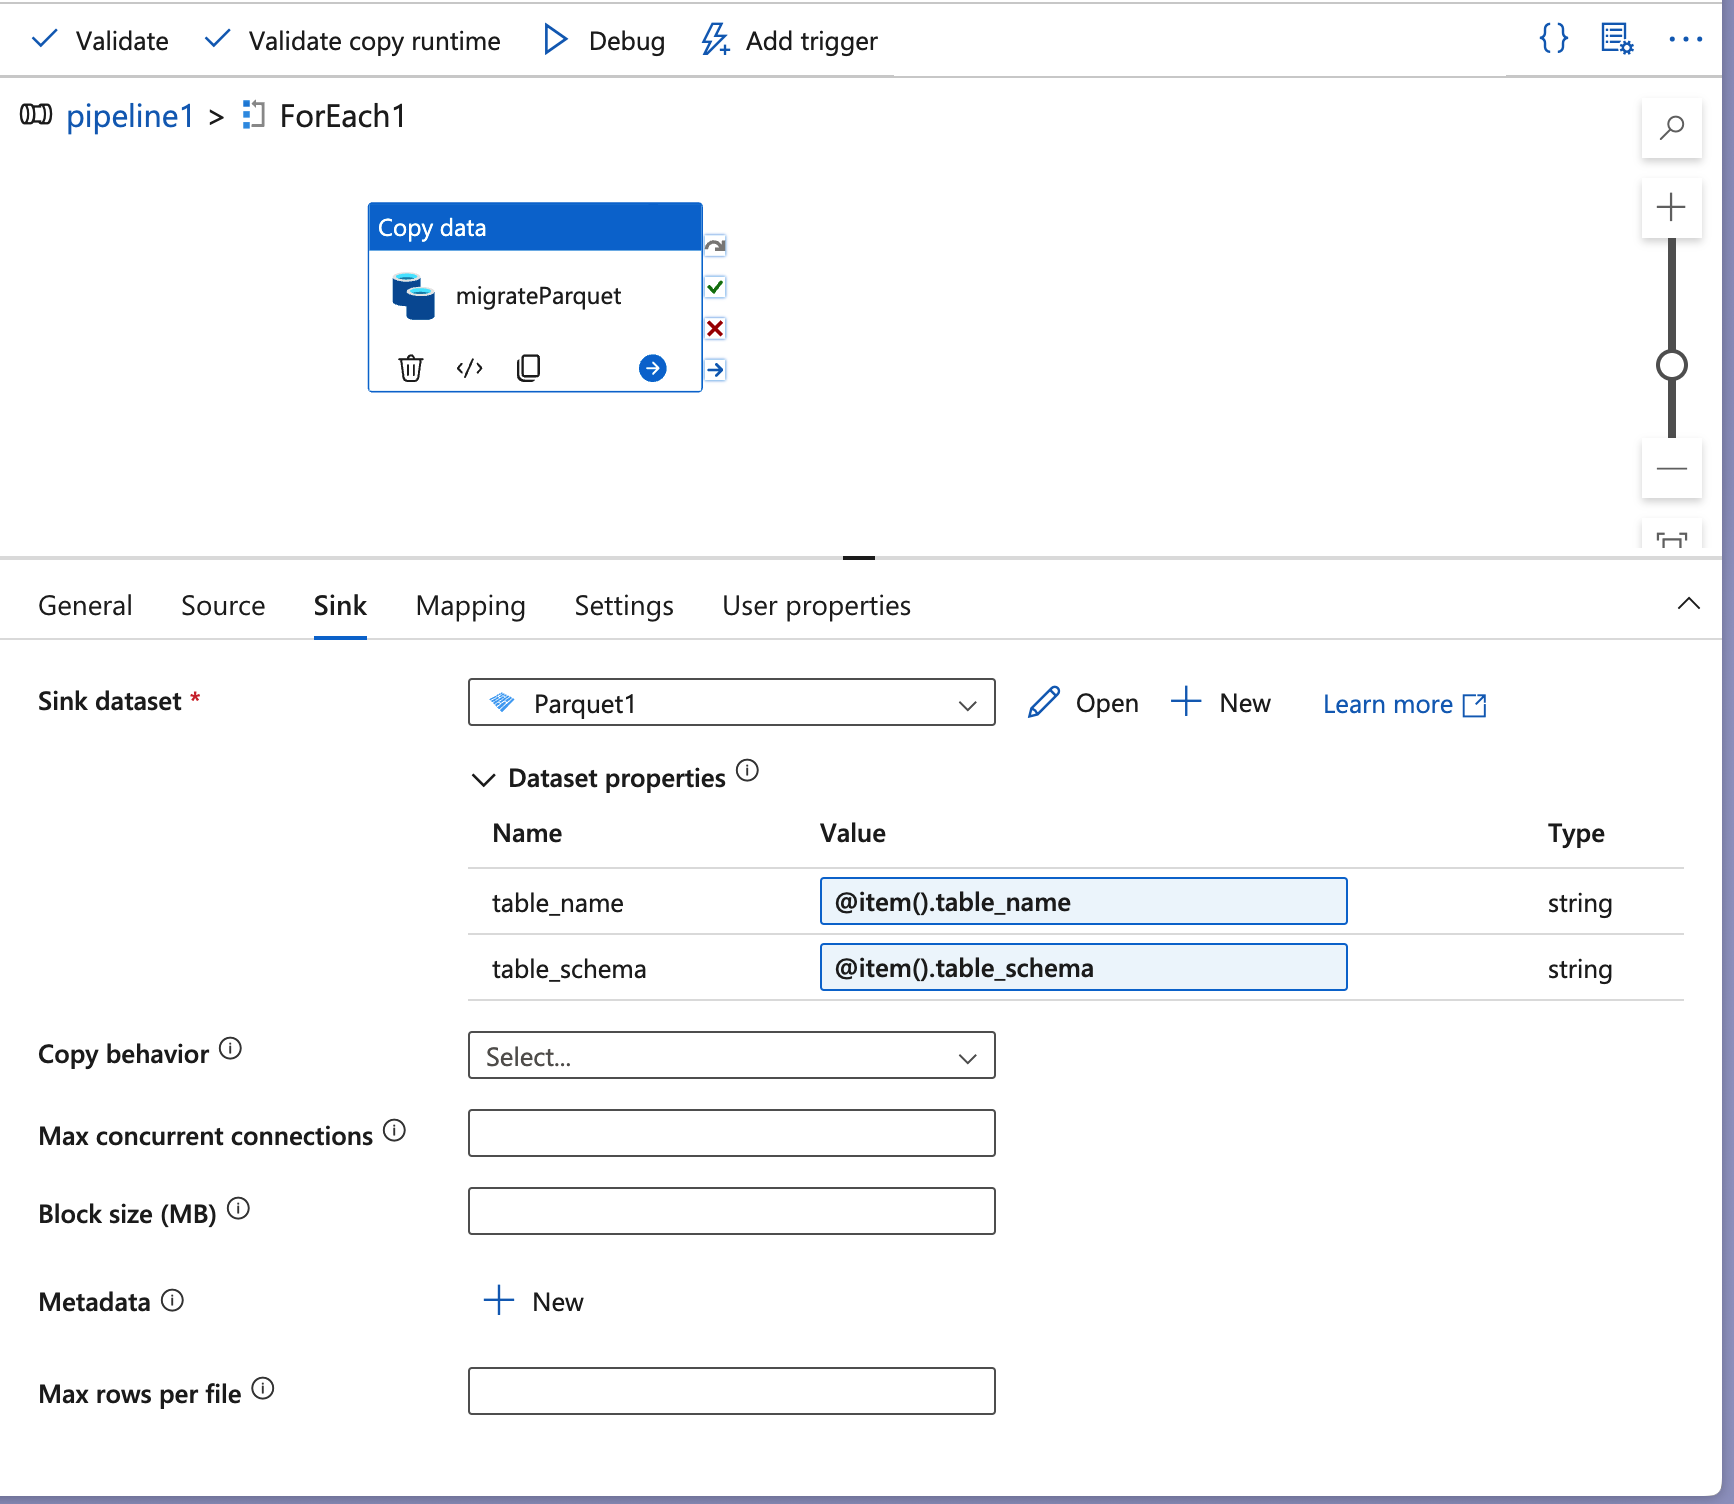
Activity (
migrateParquet): Inside theForEachactivity, there’s aCopy dataactivity labeledmigrateParquet, which handles the actual data migration and conversion to Parquet format.Sink Dataset (
Parquet1): In the Sink tab, the destination dataset is configured to be a Parquet file format (Parquet1), where the converted data will be stored.Dataset Properties:
table_name: Configured using the expression@item().table_name, which dynamically assigns each table name fetched by theLookupactivity.table_schema: Similarly,@item().table_schemaassigns the schema name for each table.
These properties ensure that each table is correctly mapped to its corresponding schema and name in the Parquet format.
Copy Behavior Options: Options like
Max concurrent connections,Block size (MB), andMax rows per fileare available but left blank here. Adjusting these can optimize performance based on data volume and Azure Storage configuration.
Future Access and Scalability
Our Data Science team can now seamlessly access the Parquet files through Azure Databricks or Azure Fabric, empowering them to analyze data more effectively. With ADF, we’re also able to monitor and manage data workflows easily, scaling as our data needs grow.
Conclusion
By leveraging Azure Data Factory and converting our dataset to Parquet, we’ve achieved a scalable, cost-effective data pipeline that meets both our storage and access requirements. Not only has this approach reduced operational costs, but it also provides our teams with a powerful framework to handle large datasets in Azure.This solution shows how the right combination of tools—in our case, ADF and Parquet—can transform complex data challenges into manageable, efficient workflows in the cloud.
Shoutout to My Data Wizard: Sudipta Ghosh!
I would like to extend my heartfelt thanks to the data engineer, Sudipta Ghosh, who collaborated with me throughout this project. Their expertise and support were invaluable in overcoming numerous challenges we faced.
Additionally, some tables encountered issues during the Parquet conversion due to datetime format inconsistencies. We’ll cover how we resolved these issues in a future blog post.